Introduction
Knots are knots, but some are more suited to a particular purpose than others.
Sometimes the name gives this away. A ‘bend’ is a knot to join two ropes. A ‘hitch’ attaches a rope to an object, a ‘loop’ forms a (usually) fixed loop in a line, either free or around an object. But many knots do not give this away in their name – Bowline, Reef knot, Figure-eight knot etc.
Often, the same knot may have different names (Reef knot/Square knot, Sheet bend/Becket bend etc.) depending on geographies and usage etc. Focus on application and method rather than name!
There are also often different ways to tie the same knot – we show two ways for the Sheet Bend and Bowline here for example – pick a method that works for you. So long as the knot is tied right and has right intended use/purpose, there is no right method.
A common means of describing the various parts of a rope and certain shapes used to form knots is important. We use the following:
Working end: The part of the rope we are using to tie the knot (Might hear ‘tag end’ and ‘running end’ but avoid and try to use more universally accepted term)
Tail: The end of the working end (technically either end but we are generally working with the working tail so ‘tail’ usually refers to this)
Standing end: The other end of the rope
Standing part: The part of the rope between the standing end and the knot – this is the part of the rope that will likely be under tension once the knot is tied
Bight – a loop in a rope (not knotted or fixed)
An overhand loop – if the tail of a bight is passed over the standing end, you get an overhand or anti-clockwise loop
An underhand loop – if the tail of a bight is passed under the standing end, you get an underhand or clockwise loop
Anchor point – not necessarily an anchor but just the object you are tying to.
You might hear Bitter end, particularly in a boating context. This is the end typically attached to the boat (Derivation: A bitt is\was deck furniture like a cleat). Some people refer to the tail end as the bitter end but this is incorrect. Try to avoid this term as it is not universally known. A bitter end is also the standing end – use that instead.
Rope Terminology – helpful video: https://www.youtube.com/watch?v=Yn0JYAnPKlQ
When teaching knots to others, ‘show and tell’ at same time. Use precise, succinct language, always teach checkpoints!
(Ideally all knots should follow a set tying pattern of ‘right to left, up then down’ as it makes the knot easier to verify by someone else but this is usually beyond novices and many right-handers will prefer to tie left to right – for example doing turns)
The following knots are useful for mariners (especially Powerboat 2 students!)
- Reef knot
- Clove Hitch
- Round turn and two half hitches
- Bowline
- Sheet Bend
Reef knot
Description: Thought of as a knot (i.e. bend) for joining two ropes of equal diameter. (However more accurately it is a binding knot for securing items rather than a bend for joining ropes – see ‘Disadvantages’, below)
Advantages: Simple to tie – most people already know this knot! Easy to recognise if correctly tied. Easy to untie if not jammed.
Disadvantages: Can slip and invert easily under (heavy) load. Can jam and be hard to untie. Not effective if ropes are not same diameter – use Sheet Bend instead. Mis-tying the reef knot can end up in one of three knots that are significantly weaker than even the reef knot!
Tying Steps
- Hold the two ropes, one in each hand, tails pointing to each other
- Form a diagonal cross with 10 cm or so in from the tails with the right tail over the left tail
- Take the right tail under the standing part of the left rope
- The same tail, which is now on the left pass over and under the other tail
- Tighten (‘dress and stress’) all parts up
Note: This knot is easier to tie than to describe! Think: ‘Right over left, left over right’
(It can be made more secure by having 15cm tails that you then tie an overhand safety knot in but there are better bends to use instead – Alpine Butterfly Bend, Zeppelin Bend, Double Sheet Bend etc.)
Fun fact: Europeans tend to tie their shoes with a ‘doubly slipped reef knot’ (Americans often use twin looped bunny ears or ‘two-loop shoelace knot’).
Checkpoints
- Two over-locking bights (see picture 1)
- The tails are either both on top or both below the two standing parts (i.e. they oppose each other) (see picture 1)

Picture 1 Credit: www.cavinguk.co.uk
Mis-tying the reef knot can end up with either a thief knot, a granny knot or a grief knot – all likely to fail under little load (picture 2, thief, reef, granny, grief l-to-r)

Picture 2 Credit: Scientific America March 2025
Untying
If not jammed, easy to untie. Unload and either ‘unpick’ from one tail or push the two bights apart by grabbing respective tails/standing ends in each hand and push hands together. If jammed under heavy load may find unable to untie.
Clove Hitch
Description: Hitch to (temporarily) secure a rope to a post, spar, or carabiner
Advantages: Can adjust easily when tied so great for fenders when you need to adjust height.
Disadvantages: It can slip if the rope is stiff or if there is not enough friction. It should not be used as a permanent, high-load securing, particularly on slick surfaces.
Tying: Easy to tie. (there is a variant if struggling to tuck tail back.)
Method 1 :Traditional approach
Steps
- Wrap: Pass the rope around the post.
- Cross: Bring the rope over itself, forming an ‘X’, and wrap it around the post again.
- Tuck: Pass the working end under the second wrap (the last turn).
- Tighten (‘dress and stress’): Pull both ends to secure the knot.
Nice demo: https://www.youtube.com/watch?v=JMc7ejuBabk
Checkpoints
- Two turns (technically: ‘one round turn’) around anchor point
- Diagonal locking ‘bar’
- Working end and standing end are in middle of knot
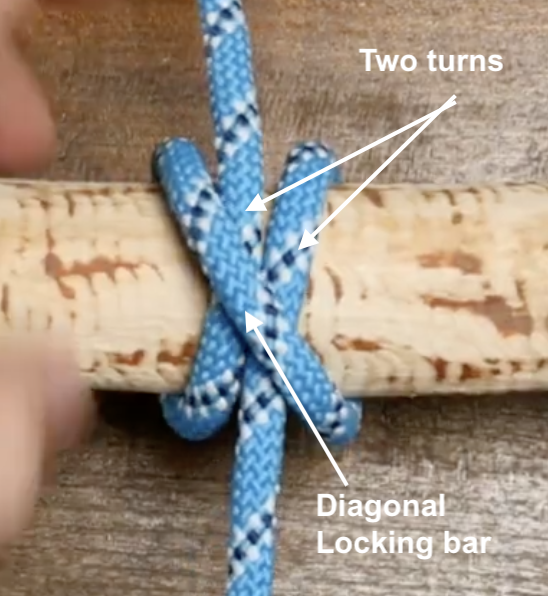
Picture 3 Credit: @jasonknots (YouTube)
Untying
Easy to un-tie.
Method 2: Front loop
- Demoed in this video – can ignore the safety two half hitches at the end – just focus on tying method: https://www.youtube.com/watch?v=jSElk0LenR4
Round Turn & Two Half Hitches
Description: a hitch to fasten a rope to a post, ring, or spar – e.g. for mooring boats or attaching fenders
Advantages: Excellent under load (friction from the initial turn allows it to be tightened without binding). Usually easy to untie even after holding heavy tension. Can be untied under load.
Disadvantages: In extreme situations can jam or slip (esp. with slippy ropes like Dyneema) but this is fairly rare.
Tying Steps:
- Round Turn: Wrap the working end of the rope around a post or ring twice, ensuring the wraps sit neatly (ideally right to left so that ‘figure 4’ memory trick below works).
- First Half Hitch: Bring the working end around the standing line (the main rope) and pass it through the loop created, then pull tight. “Figure 4 then back through the back door”
- Second Half Hitch: Repeat the process of passing the working end around the standing line to create a second, identical hitch.
- Finish: Pull the entire knot tight, ensuring the half hitches are secure against the main line
Notes:
A good way to remember the half-hitch is ““Figure 4 then back through back door”.
Bring the tail of the working end in front of the standing part down and then at right angles to form a shape that looks like a figure ‘4’, then pass the tail around the back and through the loop created by the ‘4’. See Demo of “Figure 4 then back through the back door”. (Only works is you wrap the turn right to left, otherwise it’s a ‘figure 4’ seen from behind!). https://www.youtube.com/watch?v=jSElk0LenR4 (from 0:40 seconds in)
Fun fact: The two half hitches form a clove hitch if done correctly. If done symmetrically, it’s technically a round turn and cow hitch which is not as secure but in practice should not be an issue.
Checkpoints
- A ‘full round turn’ (this looks like two turns on the anchor point)
- Two cinched up half hitches (important) that go in same direction, not symmetrical (last bit less important)

Picture 4 Credit: knots3d.com
Untying
Can be untied under load! Uncinch half hitches which should not be under tension, slip the round turn when ready.
Bowline
Description: Fixed loop knot, used a lot on boats esp. for mooring etc.
Advantages: Strong(-ish), Can be pre-tied loop or tied around object easily, easy to check proper tying (but only if you know what to look for – see checkpoints, below)
Disadvantages: Like reef knot can work loose under repeated load/unload situations. OK as a ‘marine rescue knot’ (MOB etc.), but would not be regarded as safe for rescue on land. High risk of failure if tied incorrectly.
Tying: Trad method is ‘Bunny’ or ‘Snake’. Arguably better is ‘Snap’ or ‘Jedi’ method.
Method 1 :Bunny
Steps
- Form a small overhand/anti-clockwise loop. (Good to use both terms when teaching as some people struggle to understand one, but better understand the other).
(Note that the size (diameter) of the eventual loop that you form will be half the rope left on the working end the other side of the small loop, less 10-15cm! You cannot (easily) adjust size of standard Bowline loop when tied)
- Pass the tail of the working end up through the loop (‘Bunny out of his hole/burrow’)
- Pass the tail around the back of the standing part anti-clockwise (‘Bunny behind the tree’)
- Feed the tail back down the loop (Back down the hole/burrow’)
- Make sure you have at least 10, ideally 15cm tail – 10cm is about width of male fist, 1.5 female fist, YMMV: measure it!
- To tighten (or ‘dress and stress’), hold tail and inside of righthand loop in one hand, standing end in other and pull together
Checkpoints
- A bight behind the standing part of the rope (some say looks like a lifejacket)
- Held in place by a locking ‘collar’ against the tail and one side of the loop.
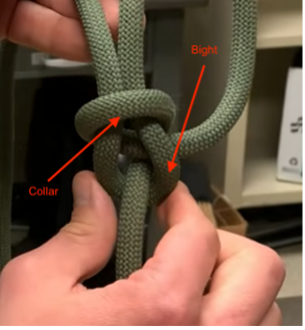
Picture 5 Credit: @dappersapper (Youtube)
Note: The tail should be inside the loop for a std bowline. If the tail runs in the same direction as loop but outside you have tied a Dutch/Cowboy Bowline – ignore myths this is weaker – indeed it is proven that it stronger if the loop is sideways loaded! But you should know what you have done (bunny went clockwise behind tree instead of anti-clockwise.)
Untying
Cannot be (easily) untied under load – don’t try. When unloaded, ‘Crack the bight’: Turn knot over so bight runs over, not under, the standing part. Push centre of bight towards standing end. Knot will loosen with ease irrespective of prior loading. Pull tail back, knot will unravel.
Method 2: ‘Snap’ or ‘Jedi’
Arguably better than Bunny for several reasons:
- Some feel easier to remember
- You can pre-tie half of it so that when you arrive at a pile, mooring ring etc. you simply need to pass the tail round/through the object and then through the pre-formed slipknot
- Because people almost always learn Bunny with the fixed loop towards them, some people (not all) really struggle to tie it when they need the loop to be away from them (i.e. the loop is inverted so Bunny needs to dive down burrow first – not intuitive!)
- The method demonstrates that the bowline and the sheet bend are the same knot: if you know how to tie one this way, you know how to tie the other – you get a ‘toofer’!
Steps
- Form a small overhand/anti-clockwise loop. (Good to use both terms when teaching as some people struggle to understand one, but better understand the other).
(Note that the size (diameter) of the loop that you form will be half the rope left on the working end, less 10-15cm! You cannot (easily) adjust size of standard Bowline loop when tied)
- ‘Collapse’ or fold the loop back onto the standing end
- Pull a bight from the standing end through this loop. (If you cinched this down it would be a standard slipknot – but at this stage don’t)
- Take the tail and pass it up (under to top) through the slipknot loop
- To tighten (‘dress and stress’) – Hold right hand side of loop and with plenty of tail (10-15cm) in one hand and the standing end in the other and pull – the knot will ‘collapse’ into a standard bowline
Note this method must be demonstrated as first time it feels a bit less intuitive than Bunny.
Checkpoints
Same as Bunny
Untying
Same as Bunny
Note:
Most Youtube videos for Snap/Jedi Bowline show a slightly different approach in step 1 and 2 by first doing an underhand loop and then passing the bight through – it’s the same result just slightly different technique. The advantage of using the method above is the loop direction is the same as in Bunny so you can ‘fail-over’ from one method to the other more easily.
If in step 4 you pass the tail down through the loop (top to bottom) you form a Cowboy/Dutch bowline!
Relation to sheet bend:
If you tie the slipknot in the cordage/rope that is the smaller diameter, and then pass the second thicker cordage/rope through the slipknot loop, and pull holding the standing end and tail of the thicker cordage and standing of the thinner cordage, it will collapse into a sheet bend proving they are the same knot.
Sheet Bend
Description: Bend for joining two ropes, especially good if different diameters.
Advantages: Easy to tie, low profile, more secure than Reef Knot
Disadvantages: Requires constant load, can be mis-tied, Can slip with slippy rope – Double Sheet Bend is option in these cases.
Tying: Trad method, Snap/Jedi method (arguably preferred)
Method 1 :Traditional
Steps
- Create a Bight:Make a U-shaped bend (bight) in the thicker or more rigid rope.
- Pass Through:Pass the working end of the thinner rope up through the bight.
- Wrap Around:Wrap the thinner rope around both legs of the bight, going behind them.
- Tuck Under:Pass the end of the thinner rope under its own standing part.
- Tighten:Pull all four ends to tighten and “dress and stress” the knot.
Note: Can be used for equal diameter rope too and will be more secure than Reef Knot
Checkpoints
- Bight is in thicker rope/cordage
- Loop formed by thinner cordage locks down on tail (unlike Reef knot which is symmetrical)

Picture 6 Credit: Paracordplanet.com
Untying
Hard to untie under tension but like the Bowline, once unloaded, you can ‘Crack the bight’ pushing either bight back to the standing end of the other rope.
Method 2: ‘Snap’ or ‘Jedi’
Arguably better than Traditional method for several reasons:
- Some feel easier to remember
- The method demonstrates that the bowline and the sheet bend are the same knot: if you know how to tie one this way, you know how to tie the other – you get a ‘toofer’!
Steps
- In the thinner rope/cordage, form a small overhand/anti-clockwise loop. (Good to use both terms when teaching as some people struggle to understand one, but better understand the other).
- ‘Collapse’ or fold the loop back onto the standing end
- Pull a bight from the standing end through this loop. (If you cinched this down it would be a standard slipknot – but at this stage don’t)
- Take the tail of the thicker rope and pass it up (under to top) through the slipknot loop
- To tighten (‘dress and stress’) Pull both ends (standing part & working tail) of thicker cordage
Checkpoints
Same as Traditional
Untying
Same as Traditonal
Relation to Bowline:
The Sheet Bend is the bend version of the Bowline, you can confirm this by comparing the knot element of both.